PS2Tap Installation
Installation of the PS2Tap in the PowerSyncII inverter is quick and easy. Most installations take 15 minutes or less. For detailed step-by-step instructions, click on the PS2Tap Installation Guide thumbnail below:

There are three basic steps:
- Mount the PS2Tap inside the inverter. This requires three holes to be drilled in the lower left side of the inverter. See the installation guide and the drill template for the specific location. We supply a pilot drill bit and a drilling template. You will need a 3/4" hole saw or 1/2" conduit knockout punch. We even send a magnet to trap metal chips from harming your inverter. Once the holes are drilled, the PS2Tap is secured using two small screws.
- Connect the PS2Tap to the inverter. Just unplug a low voltage cable from the front panel display and plug it into the PS2Tap. Then run the new supplied cable from the PS2Tap to the display. See the installation guide for the correct cable routing. This is critical to proper operation of the PS2Tap.
- Plug our gateway into your Internet connection. With the supplied antennas, the gateway can be up to 100 meters / 300 feet from the inverter. With optional high gain antennas, distances of up to 1 mile can be bridged. This flexibility allows the inverter to be in an out building and the wireless gateway to be inside near your Internet connection.
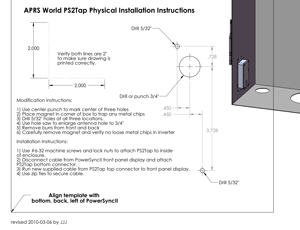
Click the image above for a PDF with installation instructions and a template for drilling holes for the mounting screws.